Online test
Introduction
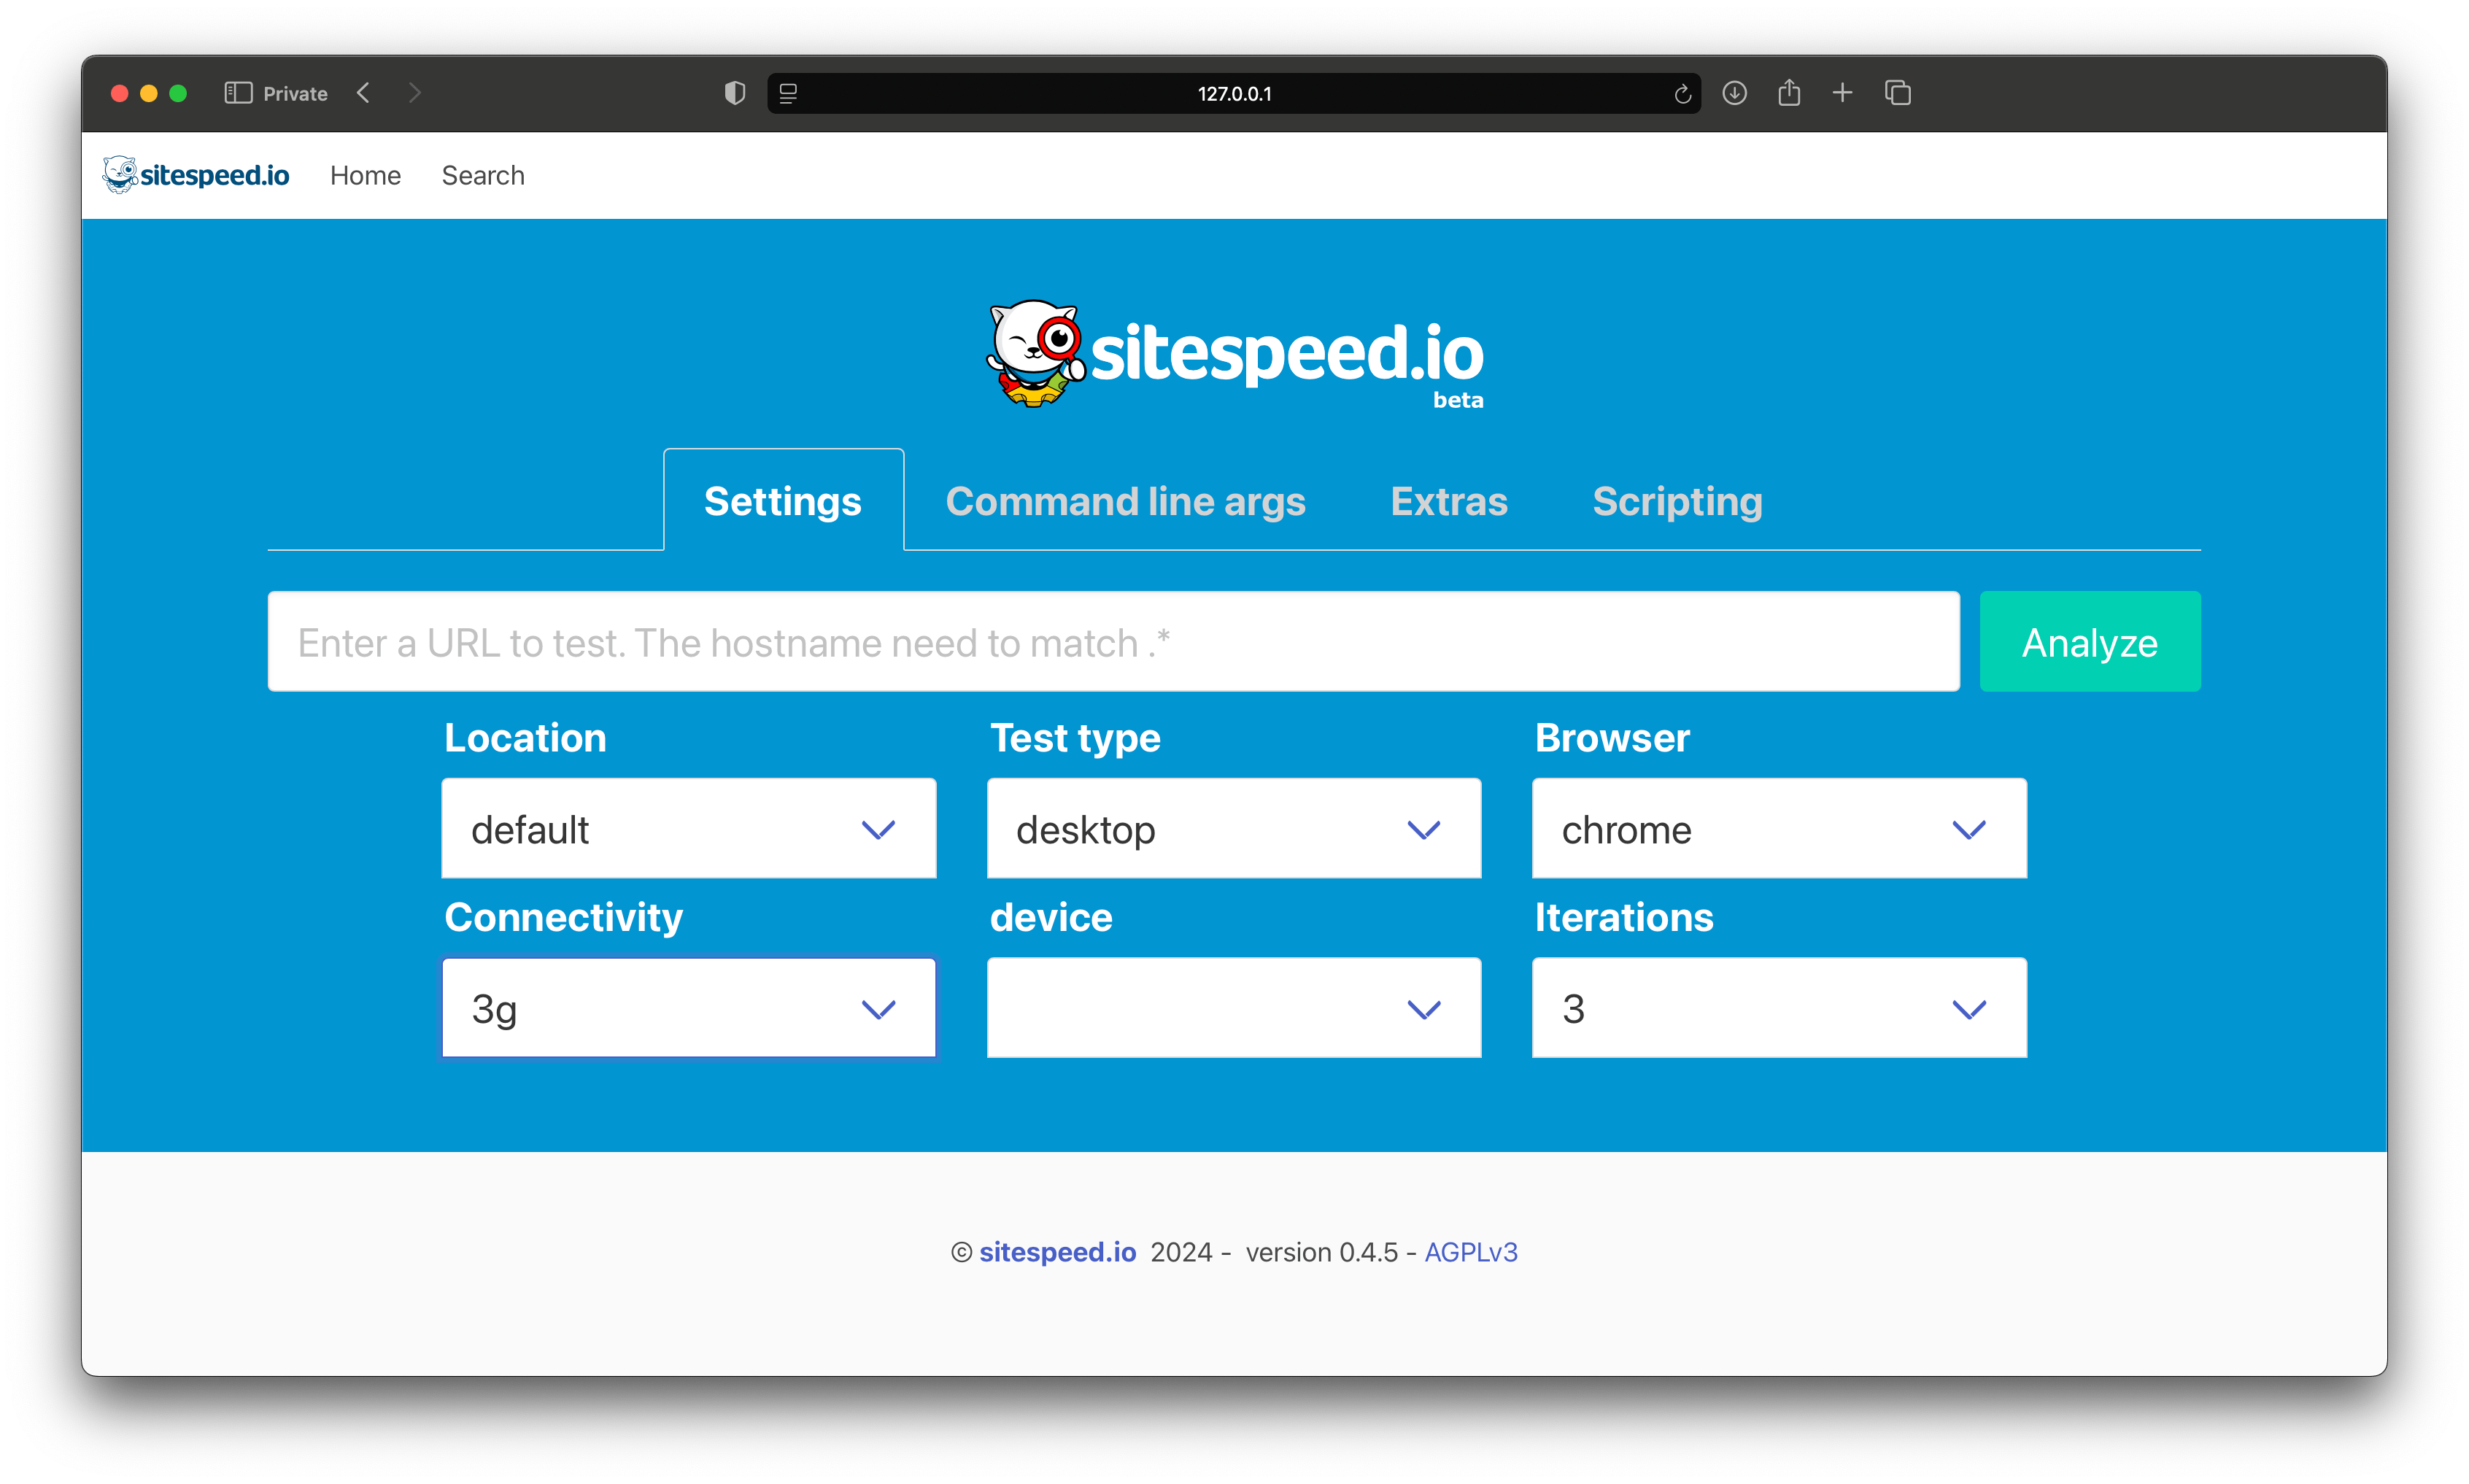
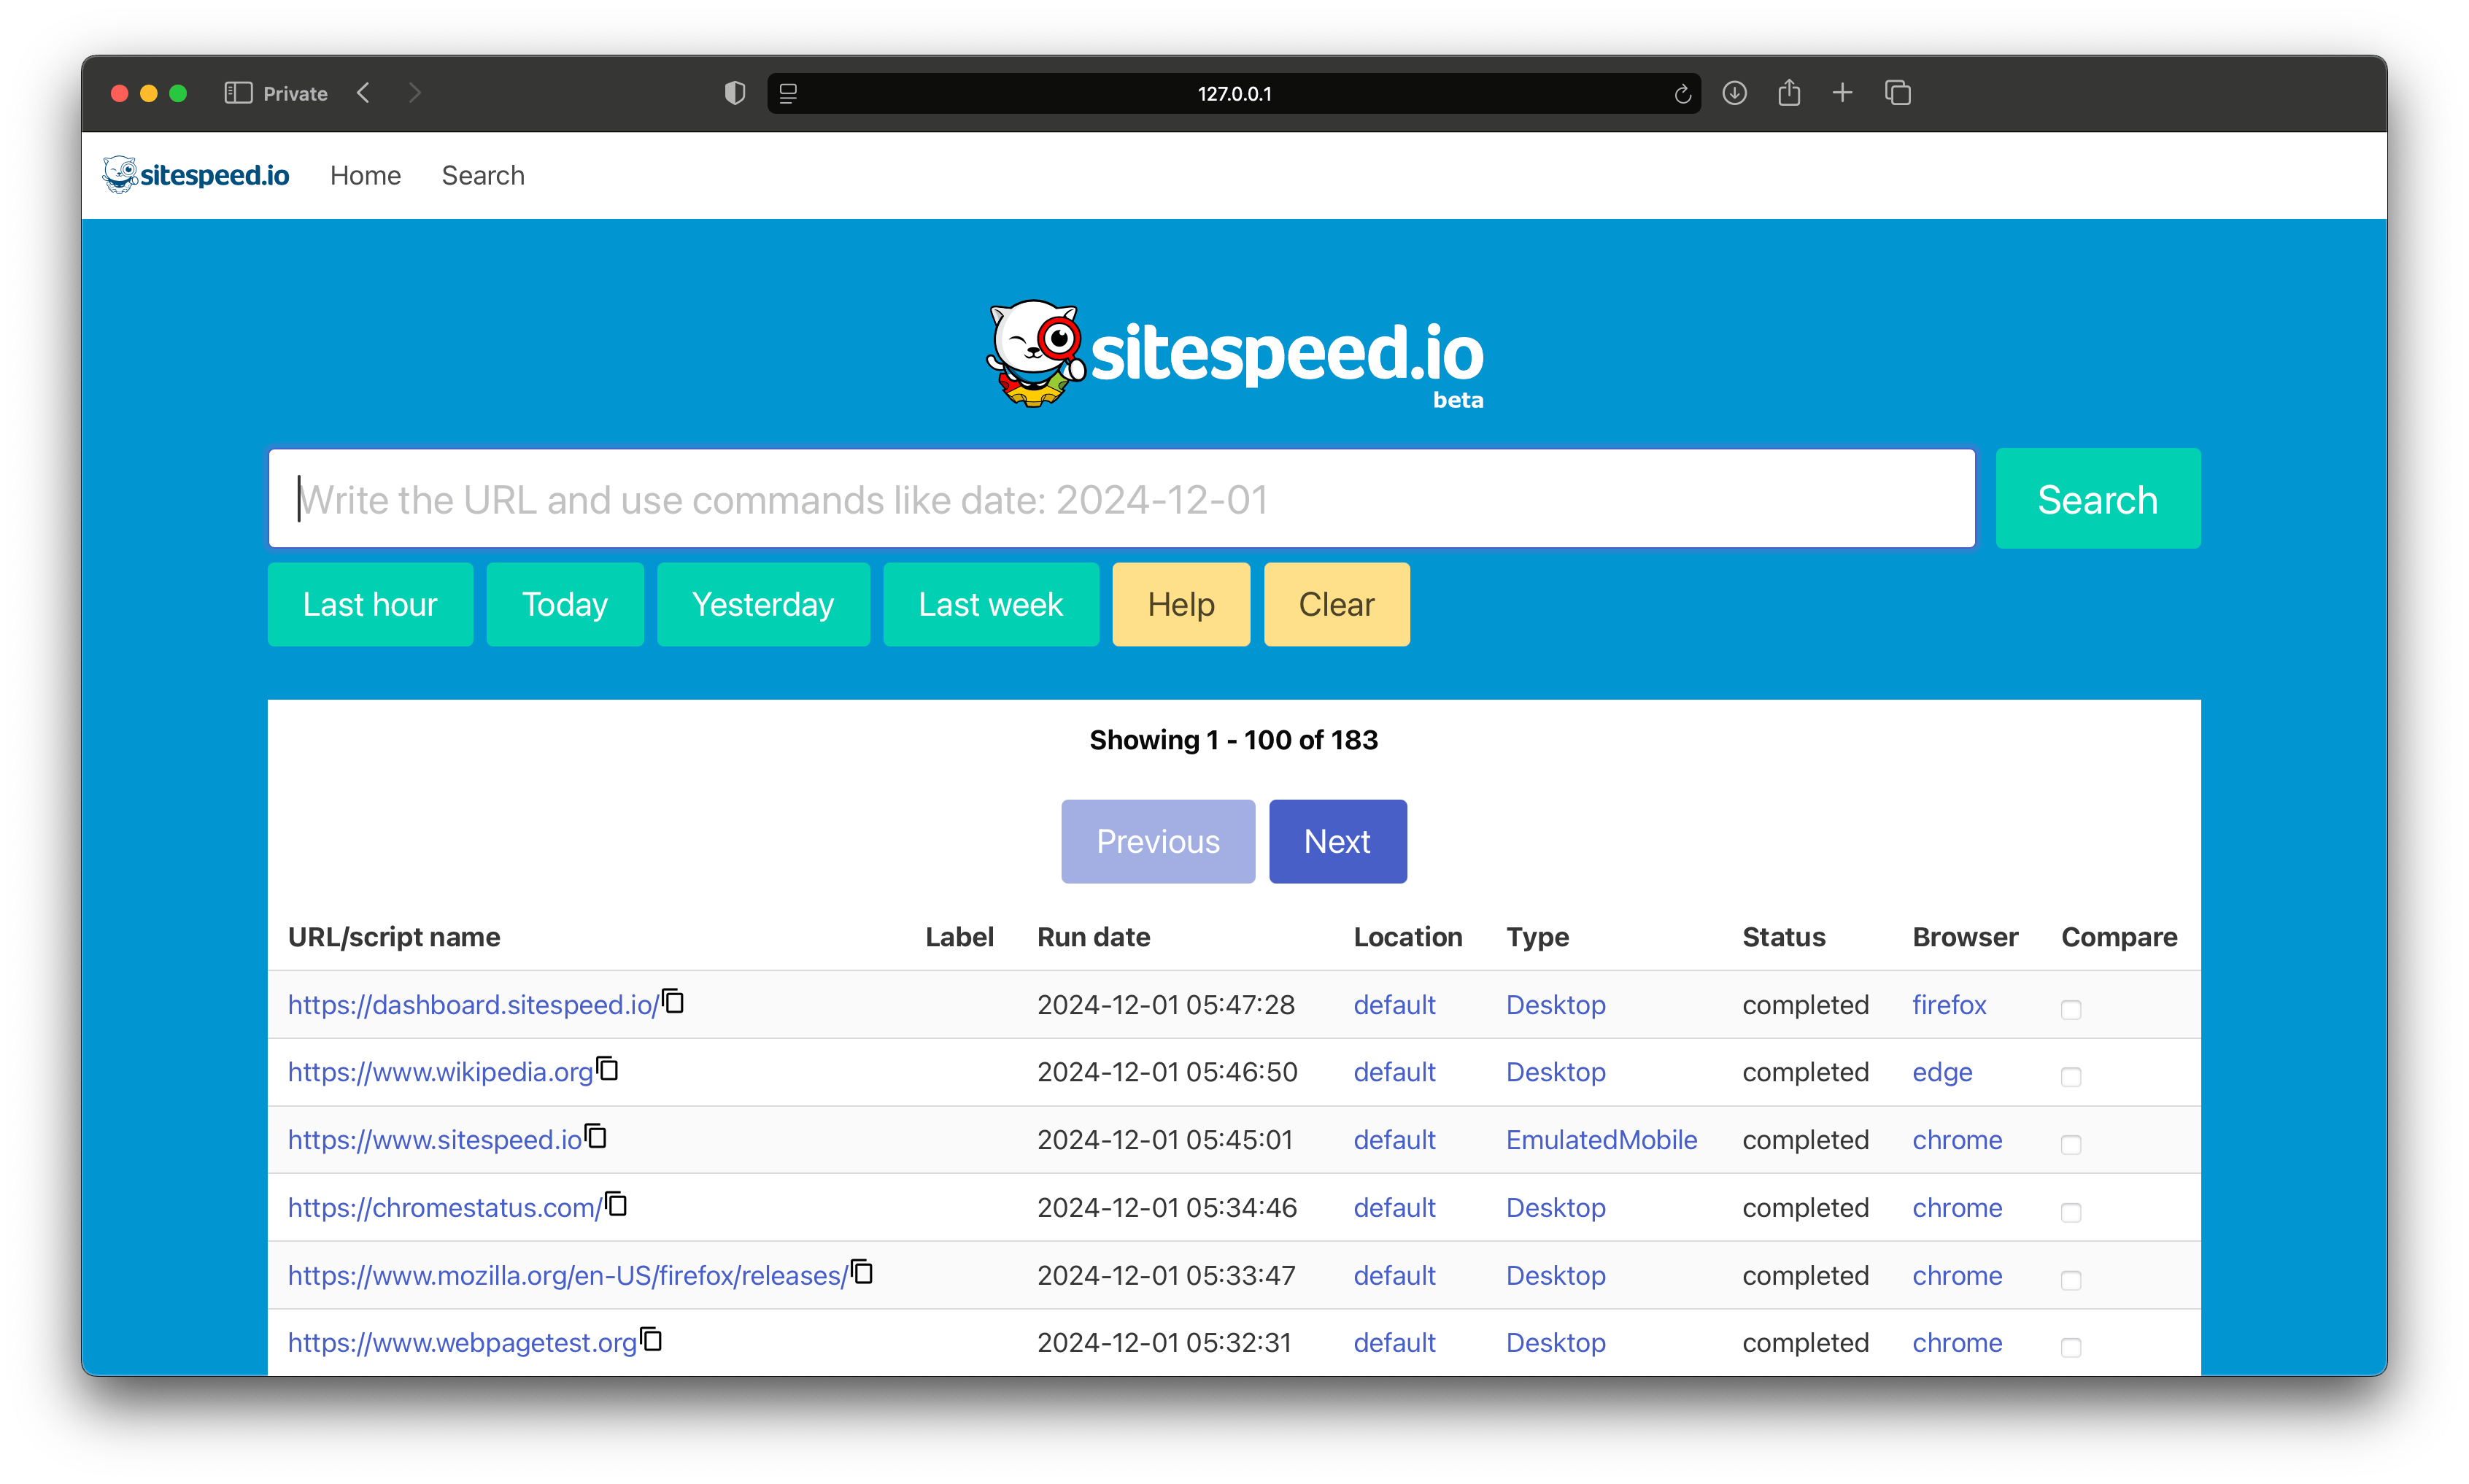
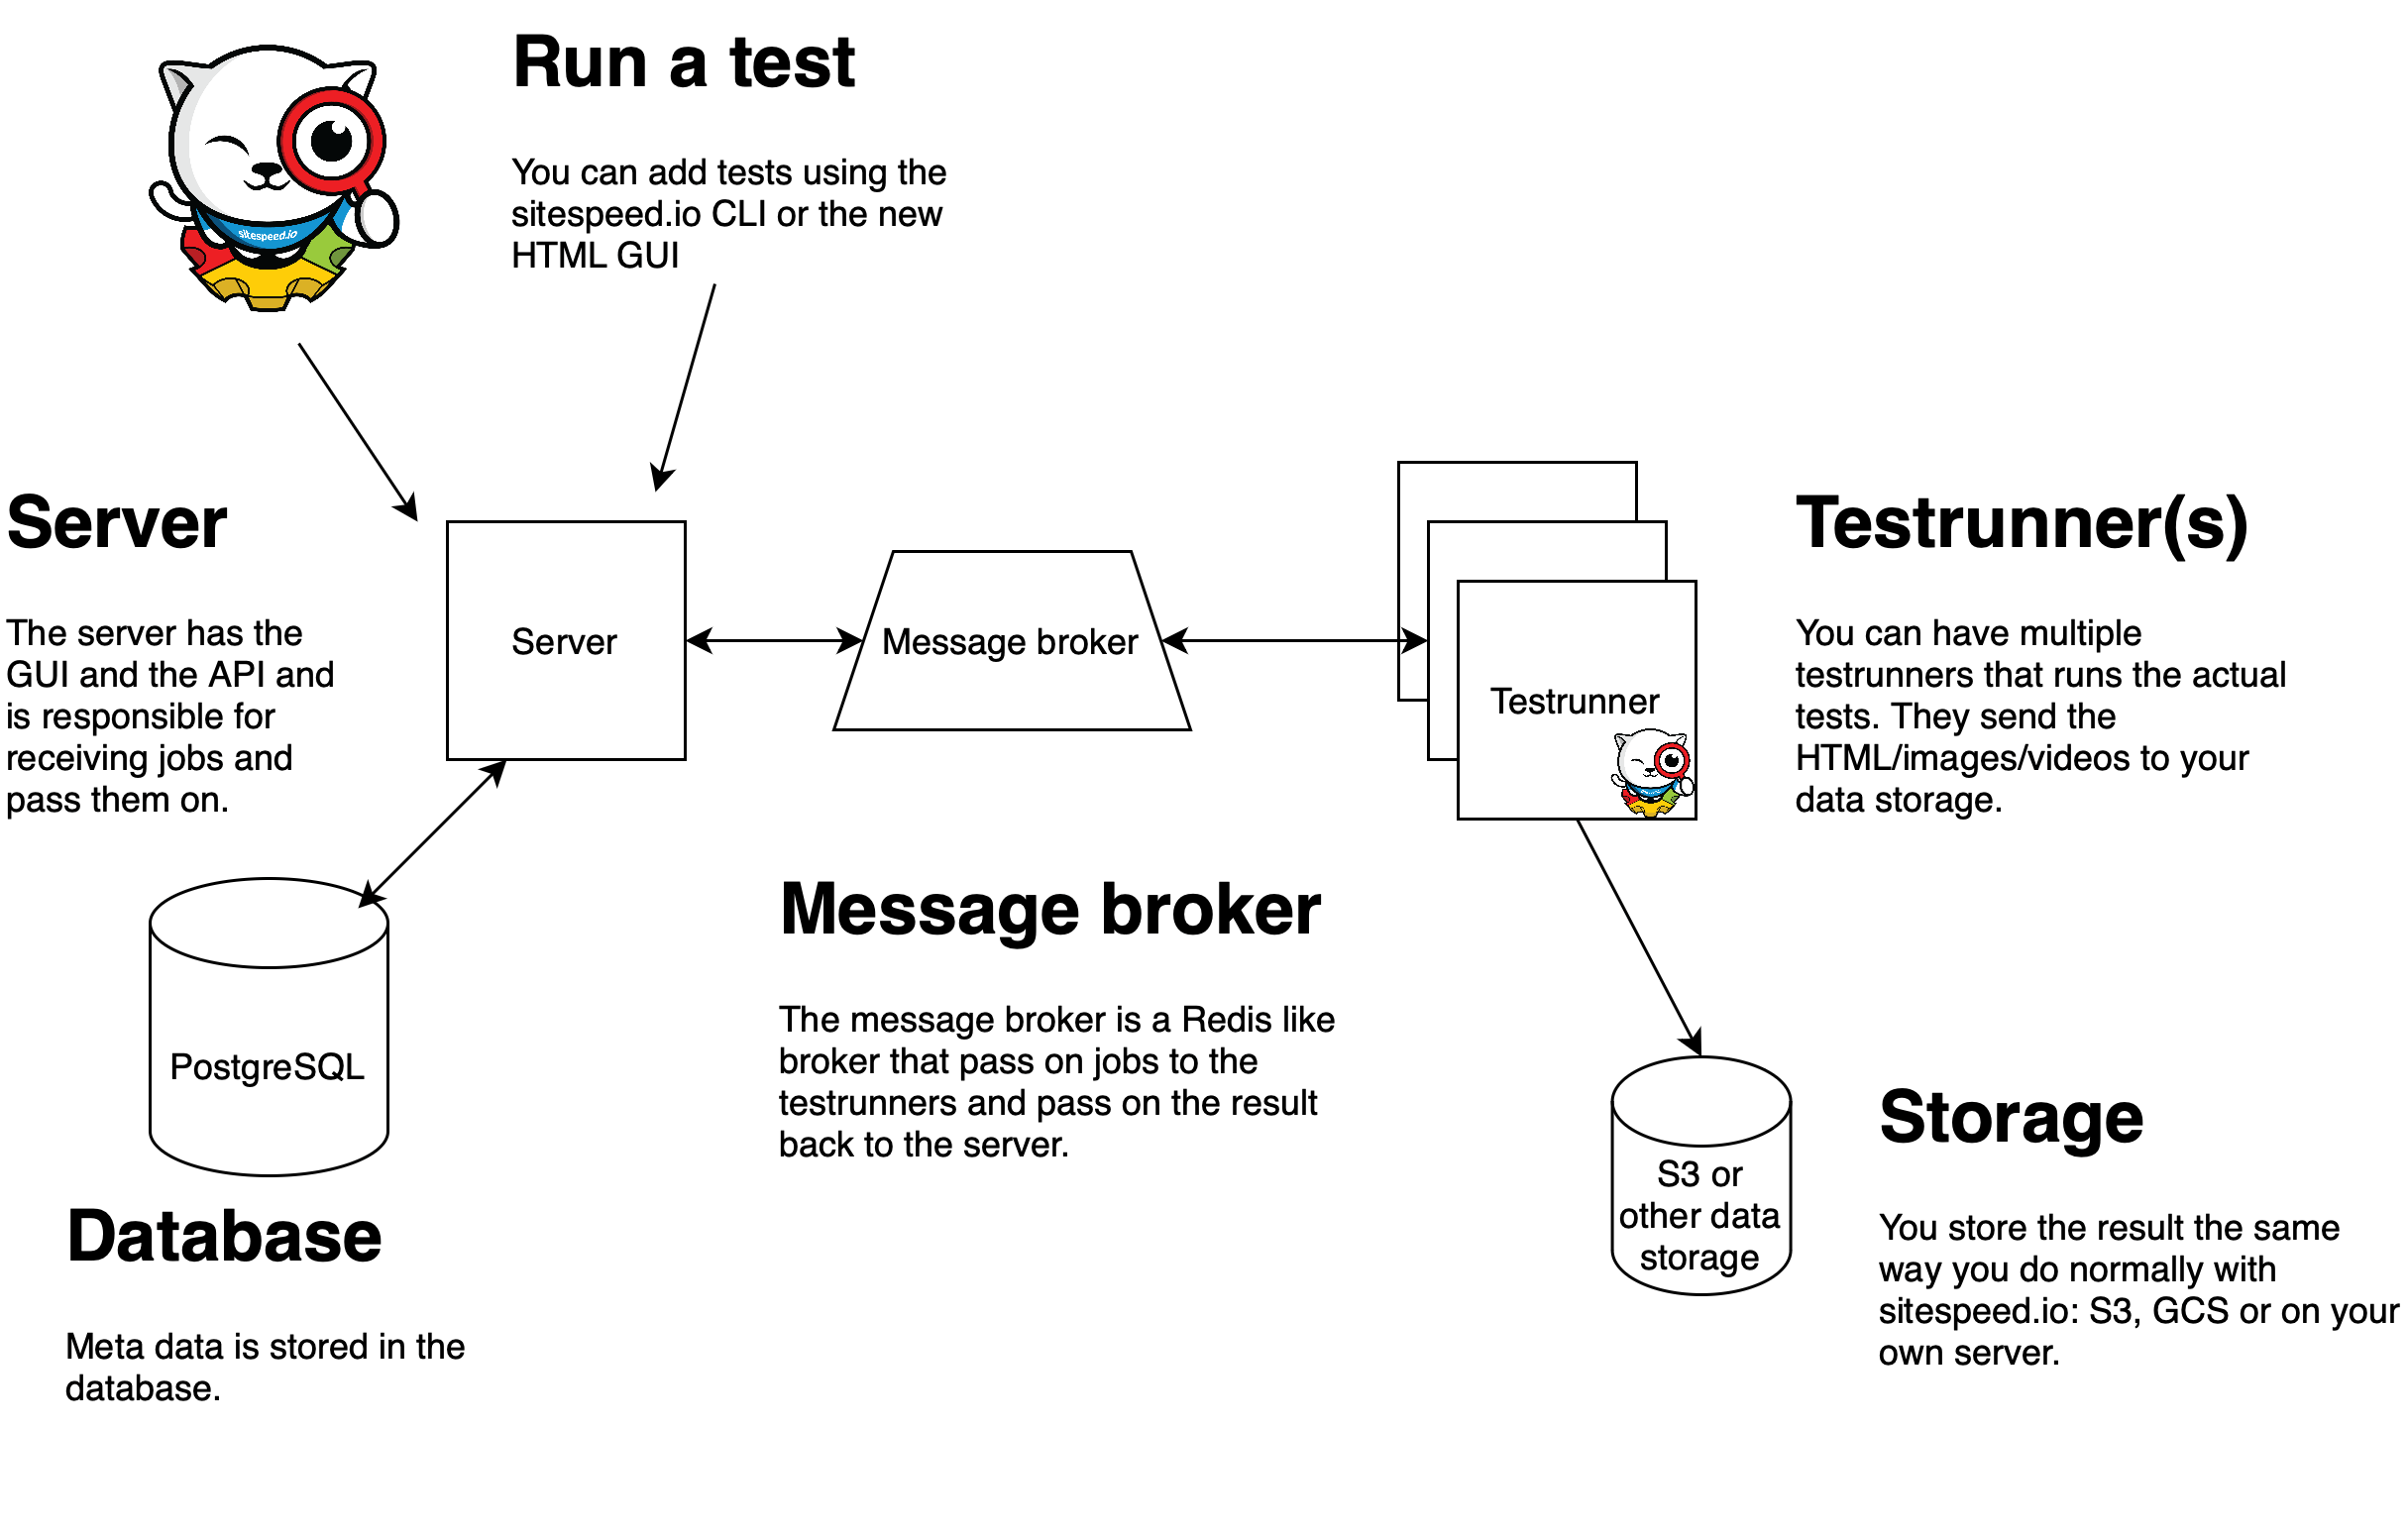
The online test is the simplest way to deploy your own version of sitespeed.io. You can add tests through a web GUI or by using the sitespeed.io command line, which pass the tests to your test server. This means that you can use your dedicated test machines both for monitoring and one off performance tests.
This method is ideal for small, medium, and large companies and organizations that also wants a GUI for running performance tests.
To get started, you will need the sitespeed.io server, at least one sitespeed.io test runner, and the necessary dependencies (a message broker like Redis, PostgreSQL, and a place to store the result pages).
Installation
For small businesses needing to test one or a few websites, you can deploy everything on a single dedicated server. For large companies planning to run many many tests, you can distribute the components across multiple servers. If you plan to run tests from various locations worldwide, ensure the web GUI, database, and Redis are located together in the same region since the web GUI is the one that do the most communication with Redis and the database.
Using Docker
It's easy to get the Docker version running on your local Linux or Mac OS machine. Make sure you have Docker and docker compose installed.
-
Clone the repository:
git clone https://github.com/sitespeedio/onlinetest.git -
Navigate to the project directory:
cd onlinetest -
Copy the example environment file:
cp .env.example .env -
Start the Docker containers (Redis/PostgreSQL/Minio/sitespeed.io server and testrunner):
docker compose -f docker-compose.dependencies.yml -f docker-compose.server.yml -f docker-compose.testrunner.yml up
Now you can open your web browser and navigate to http://127.0.0.1:3000 to run your first test.
If you are on Linux you need to run sudo modprobe ifb numifbs=1 to be able to set different connectivities inside of Docker. On Mac you can only run native connectivity when you run inside of Docker.
Using NodeJS
To get the server and test runner running, you need to install NodeJS. Please follow the instructions on NodeJS for your operating system. Install the LTS version (currently, that is NodeJS 20).
Install the server
Get the latest release from npm:
npm install @sitespeed.io/server -gInstall the test runner
Get the latest release from npm:
npm install @sitespeed.io/testrunner -gThe test runner can either use our pre-made sitespeed.io Docker container (in which case you need to install Docker) or use the npm-installed sitespeed.io. If you choose not to use Docker, follow these instructions to get sitespeed.io up and running.
Install the dependencies
You need to have Redis (or a similar message broker that follow the Redis APIs), PostgreSQL and somewhere to store the HTML result. If you don't want to handle the dependencies yourself you can use our docker compose file. You need to have Docker and Docker compose installed to run it.
To get the Docker Compose file, the easiest way for testing is to clone the repository:
git clone https://github.com/sitespeedio/onlinetest.git
cd onlinetest
docker compose -f docker-compose.dependencies.yml -f standalone/docker-compose.dependencies.standalone.yml  -f  -d
In the repository you also have a .env.example file that sets up username/passwords for the different services. For Redis there's also a redis.conf file that also holds the password.
Configuration
The .env is the key for the setup if you use Docker/Docker compose. Most things for your everyday tests can be setup there.
You also have specific configuration files for the server and for the test runner.
You can override that configuration with command line parameters, or you can replace the configuration by using your own configuration file. Take a copy of the default ones and reconfigure them the way you need. When you start the server and the testrunnner you add --config /path/to/file to your new files and these will be used.
YAML / JSON
The configuration files can be YAML or JSON. Using a configuration file should be your first choice because then you are in full control.
You can provide a configuration file using the command line: --config.
When configuring the test runner, the configuration will be validated. If the configuration is broken, the test runner will not start. Check the log for a helpful message to fix what's broken.
Command line override
If you just need to change one or two configurations, you can use the command line override. If your configuration looks like this:
    redis: {
        host: "127.0.0.1"
    }
You can override that with --redis.host MY_HOST.
sitespeed.io configuration
You can also pre-configure how you will use sitespeed.io on each testrunner.
The configuration for sitespeed.io uses inheritance. On the server, you can configure a sitespeed.io configuration in the Docker compose file. That configuration will be passed on to the test runner and merged with the sitespeed.io configuration on the test runner. Finally, this configuration will be merged with the configuration from the CLI API or the GUI. It looks like this:
server -> test runner -> CLI/GUI configurations
This way, you can configure some parts globally (in the server config), some things locally (per test runner), and some parts individually per test.
The server
The server will host the HTML GUI and the API. There's a lot of things you can configure on the server.
Start the server
If your server is installed globally, you start it by running sitespeed.io-server.
When you have your own configuration, you provide it like this:
sitespeed.io-server --config path/to/fileOr if you use Docker:
docker run --rm -v "$(pwd)":/config sitespeedio/server:2.0.0 --config /config/config.ymlDatabase and message broker
The first thing you need to do is configure the PostgreSQL and Redis connections to match your setup. The default setup uses localhost and default passwords. Make sure to change these settings to match your specific configuration.
HTTPS
If you want your server behind HTTPS, you can set up a reverse proxy or configure the path to keys and certificates.
server:
  # Configure SSL. Add the path to the key and certificate file
  ssl:
    key:
    cert:
Limit who can run tests
You probably want to make sure that your instance isn't open for everyone to add tests. There are a couple of ways to limit who can use your instance by just using configuration.
Adding Basic Auth
The server can be secured with basic authentication. You can configure it with the following settings:
basicAuth:
  login:
  password:
The basic auth will be applied to all URLs except calls to the API and the admin pages (the admin page has a separate basic auth configuration).
Key for running tests through the API
You can set up a secret key that needs to be used when you send tests to the API. You configure that under api.key or in YAML:
api:
  key: MY_KEY
Then when you use sitespeed.io and the API make sure to use--api.key MY_KEY to your configuration.
Validate test domains
You probably want to limit which domains can be tested through the GUI on the server. You can do this with the validTestDomains configuration. This needs to be a regular expression that will be matched against the hostname of the URL that you want to test.
Here are a couple of examples:
- To test all URLs on https://www.sitespeed.io:
validTestDomains: "^www\.sitespeed\.io$" - To allow testing of any URLs:
validTestDomains: ".*"
Disable the GUI
You can fully disable the GUI so that tests can only be added through the API. You do this by setting: disableGUI: true.
Disable the search
You can choose to only disable the search functionality. You do this by setting: disableSearchGUI: true.
Style the pages
If you want to style the server's pages, you can do so by adding extra CSS and your own images. In the default configuration, look for the html key.
To get this to work, you should also configure where you locally host your CSS/images. You do that with the following configuration:
html:
 extras:
    path:
Set the path to where you host the files on the server. They will then be accessible through /extras/.
Waiting on tests to finish
You can choose what the user will see while waiting for the test to finish. By default, the log from sitespeed.io will be streamed on the wait screen so users can follow the progress of the test.
If you are not interested in that, you can choose to show random AI-generated images. You do that with:
html
    showRandomAIImage: true
More well-curated images will come later. :)
Change the locale
Do your users not have English as their first language? You can change the language! Use the default locale file and create a new file for your language.
localization:
  defaultLocale: en
   directory: /path/to/your/directory
The testrunner
If your testrunner is installed globally, you start it by running sitespeed.io-testrunner.
When you have your own configuration, you provide it like this:
sitespeed.io-testrunner --config path/to/fileIf you use Docker, you can start it like this:
docker run -v "$(pwd)":/config --cap-add=NET_ADMIN -v /var/run/docker.sock:/var/run/docker.sock -v /tmp:/tmp sitespeedio/testrunner:2.0.0 --config /config/config.jsonMessage broker
Your testrunner needs to be able to connect to your Redis-like broker, so make sure to configure it accordingly in your configuration file.
Configuring test environments
You need to configure what kind of tests you want to run.
Desktop/emulated mobile
In most cases, the default configuration will be sufficient. It looks like this:
- name: "Desktop Browsers"
  type: "desktop"
  browsers: ["chrome", "firefox", "edge"]
  connectivity: ["native", "3g", "4g", "cable"]
  useDocker: false
The browsers field lists the browsers you can use. The default sitespeed.io container includes the latest versions of all three browsers. If you set useDocker to true, all three will be available. If you install the browsers yourself on the server, you can edit the list accordingly.
When you set useDocker to true, the Docker container configured in:
docker:
  container: "sitespeedio/sitespeed.io:latest"
is used. If you try the Docker container on your local machine, remember to change the settings for how you upload the result since localhost/127.0.0.1 do not work automatically inside the Docker container. Use your host IP or host.docker.internal if you are on a Mac.
The connectivity array lists the different connectivity options you will see in the drop-down menu in the GUI.
Android
To run tests on an Android phone, you should follow the sitespeed.io instructions on how to set up the phone and server. The server that runs your test runner needs to have ADB tools and sitespeed.io dependencies (so it can analyze the video, etc.).
Each phone needs to be configured on the test runner with the device ID.
- name: "Android"
  type: "android"
  browsers: ["chrome", "firefox"]
  model: "Moto G5"
  deviceId: "ZY322MMFZ2"
  useDocker: false
  connectivity: ["native"]
By default, each phone will have its own queue of work, meaning you need to specify a specific device to pick up a job.
If you want to have multiple phones of the same model work on the same queue (to run multiple tests simultaneously), you can define your own queue name. Here's an example where two phones will take on jobs for all "motog5" tests.
- name: "Android"
  type: "android"
  browsers: ["chrome", "firefox"]
  model: "Moto G5"
  deviceId: "ZY322MMFZ2"
  useDocker: false
  connectivity: ["native"]
  queue: "motog5"

- name: "Android"
  type: "android"
  browsers: ["chrome", "firefox"]
  model: "Moto G5"
  deviceId: "HAY562MARW6"
  useDocker: false
  connectivity: ["native"]
  queue: "motog5"
Using sitespeed.io Docker containers
If you choose to use Docker, set useDocker to true in the configuration. Then all you need to do is make sure Docker is installed on the server.
You can configure which Docker container to use. Normally, when you run sitespeed.io, you should specify the exact sitespeed.io version, like sitespeedio/sitespeed.io:41.4.1, to know exactly which version you are using. However, if you want to deploy your test runner and let it auto-update, you can use the current major version as the tag and pull the latest image once per day:
docker:
  container: "sitespeedio/sitespeed.io:latest"
If you try out the Docker containers locally on your machine, you need to remember remember that localhost inside the container isn't automatically the same as localhost on the server. You can read about it here.
That means if you run everything locally and want to use sitespeed.io docker containers, you need to set --s3.endpoint to something else than 127.0.0.1. By default that is set here.
On Mac you can use --s3.endpoint http://host.docker.internal:9000 and on Linux you can use your actual IP. You can see how that is used in one of our GitHUb Actions.
Dependencies
To ensure the smooth operation of your sitespeed.io server and test runners, there are several dependencies you need to configure. These dependencies facilitate communication between components, data storage, and result processing. Here’s a brief overview of why these dependencies are necessary:
- Message broker: Facilitates communication between the server and test runners.
- Database: Stores configuration, test results, and other data.
- Result storage: Manages the storage of HTML results and other test artifacts.
Message broker
The communication between the server and test runners uses a Redis-like system. The default setting uses Redis, but you can probably use anything that follows the Redis "standard". When the server and a test runner are started, they need access to the message broker.
You should make sure to configure your message broker to remove old data. If you use Redis you can set the max memory limit (adjust it to the RAM - OS of your server) and a remove strategy.
Checkout the redis.conf file. It looks something like this:
# The default port
port 6379
# Your password, make sure to change this
requirepass CHANGE_ME_REDIS_PASSWORD

# Choose max memory, adjust this to the server where you run Redis
# You can also choose how many objects that should stay in Redis
# by changing removeOnComplete in the server configuration
maxmemory 6GB
maxmemory-policy allkeys-lru

# You can configure to store the the data so that queued tests will survive
# a restart
appendonly yes
appendfilename appendonly.aof
appendfsync everysec

dir /data
bind 0.0.0.0
protected-mode no
Database
PostgreSQL needs to have a database and table. This setup is handled in the Docker Compose file. If you want to set up the database manually, the table structure exists here.
Result storage
The default setup uses MinIO, which is an open-source version of S3, but you can use any sitespeed.io-compatible result storage. You configure this in the sitespeed.io JSON, preferably on the server. You can use S3, Google Cloud Storage, SCP to your own server, or create your own plugin to store the data wherever you want.
If you also use MinIO, make sure to configure how long the data will be stored. You can see how this is done in the Docker Compose file, and it looks something like this:
/usr/bin/mc ilm rule add --expire-days 30 sitespeedio/sitespeedioAdd Lighthouse to your test
You can enable the possibility to run Lighthouse tests by setting a configuration in the server configuration. Set useLighthouse to true.
html:
  # Show the Lighthouse box
  useLighthouse: true
You will then have a checkbox in the extras section.
If your test runner uses NodeJS, then you need to manually install the Lighthouse plugin: npm install @sitespeed.io/plugin-lighthouse -g
If you use Docker, then you need to update which container to use. In your configuration for your test runner change the container to use the +1 container:
docker:
  container: "sitespeedio/sitespeed.io:41.4.1-plus1"
Configuration for production
Here's a checklist of things to consider when pushing to production:
- Change all the default passwords:
- Do this for Redis, PostgreSQL, Admin, Minio (or what you use) and Basic Auth.
- Change settings for where you upload your result
- Remember to change the default settings on where you upload the data and how you access it.
- Limit your instance:
- Use Basic Auth for adding tests through the web GUI.
- Set a secret key for adding tests through the API.
- Use a regular expression that needs to match the domain you want to test.
- Disable search.
- Disable adding tests through the web GUI.
- Data retention:
- If you use S3 (or Minio), make sure to configure how long the data will be kept.
- Add a job to your PostgreSQL database to remove data older than X days. You can find an example script here.
Using the API
You can use your normal sitespeed.io installation to pass tests to the server/test runner.
If you run sitespeed.io --help, you will see a section about the API. These configurations will be passed on to the test server. Your other configurations will be passed on to the test runner. This means you can configure your tests exactly as before and pass them on to the test server.
There are two parameters that you need to use:
--api.hostname- The hostname of your server that hosts the sitespeed.io server.--api.location- The name of the location where you host your test runner (thelocation.namepart in your test runner configuration).
You also have the following options:
-
--api.key- The API key to use. You configure the key in the server configuration. -
--api.action- The type of API call you want to make:add: Add a test.addAndGetResult: Add a test and wait for the result.get: Get the result of a test.- To get the result, make sure you add the ID using
--api.id. - [choices: "add", "addAndGetResult", "get"] [default: "addAndGetResult"]
-
--api.silent- Set totrueif you do not want to log anything from the communication between the API and the server. -
--api.port- The port for the API. -
--api.id- The ID of the test. Use it when you want to get the test result. -
--api.label- Add a label to your test. -
--api.priority- The priority of the test. Highest priority is 1. The default is 10. -
--api.json- Output the result as JSON.
You can then pass on the testing so it don't happen locally and instead is done on your onlinetest servers.
sitespeed.io -b chrome https://www.sitespeed.io --api.hostname YOUR_HOST --api.location THE_LOCATION --api.key YOUR_KEYDeployment
Depending on your needs you can deploy the online test on one server or use multiple servers. One dedicated server is easier and probably works fine for some testing.
One dedicated server
If you want to keep everything on a single server, you can run all services together.
-
Clone the repository and checkout a tag:
git clone https://github.com/sitespeedio/onlinetest.git cd onlinetest git fetch --tags git checkout <tag> -
Configure environment variables:
Copy
.env.exampleto.envand adjust values for your environment (database credentials, S3/MinIO, public URLs, and version pins). At minimum:- Replace all
CHANGE_ME_*passwords (REDIS_PASSWORD,POSTGRESQL_PASSWORD,MINIO_PASSWORD) with your own passwords. - Change
RESULT_BASE_URLSITESPEED.IO_HTML_HOMEURLandSITESPEED_IO_S3_ENDPOINT. They need to point to that domain (or IP) that you will use. - Verify
SITESPEED_IO_SERVER_VERSION, andSITESPEED_IO_TESTRUNNER_VERSION.
- Replace all
-
Start the server, dependencies and one testrunner:
sudo modprobe ifb numifbs=1
docker compose -f docker-compose.dependencies.yml -f docker-compose.server.yml -f docker-compose.testrunner.yml up -d
## Multiple servers

This is a minimal production oriented flow that starts from a tagged release. It assumes you will run the server, dependencies and one or more testrunners in Docker.

We use a couple of standalone compose files that will override some settings in the default compose like open ports and changing some dependencies.

1. **Clone the repository and checkout a tag:**

  ```bash
  git clone https://github.com/sitespeedio/onlinetest.git
  cd onlinetest
  git fetch --tags
  git checkout <tag>
  ```

2. **Configure environment variables:**

  Copy `.env.example` to `.env` and adjust values for your environment (database credentials, S3/MinIO, public URLs, and version pins). At minimum:
  - Replace all `CHANGE_ME_*` passwords (`REDIS_PASSWORD`, `POSTGRESQL_PASSWORD`, `MINIO_PASSWORD`) with your own passwords.
  - Change `RESULT_BASE_URL` `SITESPEED.IO_HTML_HOMEURL` and `SITESPEED_IO_S3_ENDPOINT`. They need to point to that domain (or IP) that you will use.
  - Verify `SITESPEED_IO_SERVER_VERSION`, and `SITESPEED_IO_TESTRUNNER_VERSION`.

3. **Deploy the core services (server + dependencies):**

  On your primary host, start the dependencies and the server:

  ```bash
  docker compose -f docker-compose.dependencies.yml -f standalone/docker-compose.dependencies.standalone.yml  docker-compose.server.yml -f standalone/docker-compose.server.standalone.yml up -f  -d
  ```

4. **Deploy the testrunner(s):**

  Run one or more testrunners on separate machines for isolation and scale. On each testrunner host you need to give Docker the right to change connectivity by running `sudo modprobe ifb numifbs=1` and then start the testrunner:

  ```bash
  docker compose -f docker-compose.testrunner.yml -f standalone/docker-compose.testrunner.standalone.yml up -d
  ```

5. **Setup a firewall**
  If you deploy on multiple servers you need to setup a firewall so only the servers has access to Redis, Minio and Postgres Do that with *iptables* since UFW (Uncomplicated Firewall) do not work with Docker.

6. **Verify connectivity:**

  Confirm the server can reach the testrunner(s) and that results are written to your configured storage. Use the UI or API to submit a test and ensure it completes end to end.