Documentation / Continuous Integration
Continuous Integration
You can use sitespeed.io to keep track of what is happening with your site by making sure that you don't break performance best practice rules before you push changes to production. You can leverage budgets to break your build if your page has too many assets, the assets are too big, or it's even too slow. You can even use WebPageTest metrics to break a build!
To do this you define your own budget file with rules on when to break your build. This budget will return an error status code after the run. You can also choose to output JUnit XML and TAP reports.
GitHub Actions
If you are using GitHub Actions it's super easy to run sitespeed.io. It works well with a performance budget. You should set your budget in a file in the repo that you are testing. In this example we call the file budget.json and put it in the .github folder in the repo.
Set up a simple budget that checks the URLs you test against number of requests, transfer size, third parties and different Coach scores (read the documentation on how to configure other metrics):
{
  "budget": {
    "requests": {
        "total": 100
    },
    "transferSize": {
        "total": 400000
    },
    "thirdParty": {
        "requests": 0
    },
    "score": {
      "bestpractice": 100,
      "privacy": 100,
      "performance": 100
    }
  }
}
Then you can set up your workflow either via the GitHub GUI or commit it to your repo via the command line or an IDE of your choice. The workflow YAML should reside in the .github/workflows folder of your repo and you can name it as you like. A simple example setup using a performance budget looks something like this:
name: sitespeed.io
on: push
jobs:
  run-sitespeed:
    runs-on: ubuntu-latest
    name: running sitespeed.io
    steps:
      - name: code checkout
        uses: actions/checkout@v4
      - name: running sitespeed.io container with arguments and optional Docker options
        run: docker run -v "$(pwd):/sitespeed.io" sitespeedio/sitespeed.io:42.5.1 https://www.sitespeed.io --budget.configPath .github/budget.json -n 1
As arguments and Docker options, you can use all configuration options as you usually do with sitespeed.io. Since we don't use any timing metrics in the budget, we only do one run.
If your budget fails, your workflow will fail.
When there's a new sitespeed.io release and you want to use it, you just bump the version number in your workflow.
Jenkins
The most convenient way to run in Jenkins is to use the pre-built Docker containers. You can run an installed npm version too, but that method will require additional work as you will need to set up browsers and use the Xvfb plugin to make the browsers run in headless mode. Trust us, use the Docker images, you will thank us later. ;-)
Setup
- Choose New Item and create a new freestyle project.
- Choose Add build step in the Build section and Execute shell. With this you will have a box where you can add your CLI magic. Remember that the Jenkins user needs to be able to run Docker.
- We then map the Jenkins workspace's output folder in Docker to the Host, so that the HTML result is visible outside of the container.
docker run -v ${WORKSPACE}:/sitespeed.io sitespeedio/sitespeed.io --outputFolder output https://www.sitespeed.io/ -n 1- You can then install the Publish HTML Reports plugin to make the reports easily available in Jenkins. You can add it as a Post-build Action and set the HTML directory to archive to output/ (it is relative to the workspace).

The HTML result pages run JavaScript, so you need to change the Jenkins Content Security Policy for them to work with the plugin.
When you start Jenkins, make sure to set the environment variable -Dhudson.model.DirectoryBrowserSupport.CSP="default-src 'self' 'unsafe-inline' 'unsafe-eval'; img-src 'self' 'unsafe-inline' data:;".
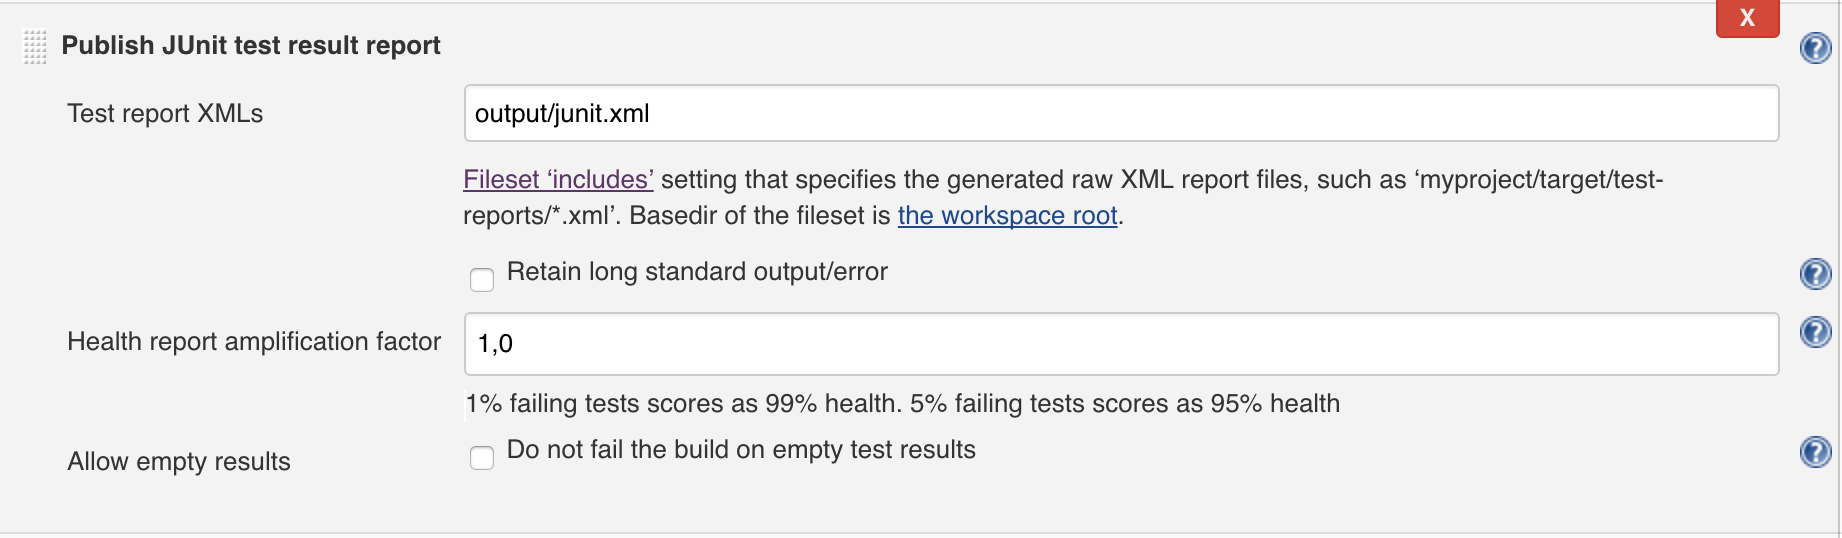
- If you want to break your build, you should generate JUnit XML and use the built-in post task Publish JUnit test result report. Make sure to make the budget file available inside the Docker container. In this example we have it inside the Jenkins workspace.
docker run -v ${WORKSPACE}:/sitespeed.io sitespeedio/sitespeed.io --outputFolder output --budget.configPath /sitespeed.io/budget.json --budget.output junit https://www.sitespeed.io/ -n 1- Set up the JUnit report:
Remember that you can also send the metrics to Graphite to keep a closer eye on all metrics over time.
Circle CI
Setting up your sitespeed tests on Circle is a straightforward process. What works best is to use Circle's Linux VM, which will spin up a pre-configured VM made to run variations of Docker and pre-installed with lots of tools that you may need to get sitespeed up and running.
- Hook up your git project with Circle to get a
.circlefolder andconfig.ymlfile - Create a job and be sure to flag the
machinevariable to true - Define your working directory
- Run Linux commands to set up the environment for testing
- Place the sitespeed docker commands in a
- run:statement
Here is a simple example of a git project that will check out the git project and run a standard sitespeed.io test with traffic shaping!
version: 2
jobs:
  test-sitespeed:
    machine: true
    working_directory: ~/repo
    steps:
      - checkout
      - run: sudo modprobe ifb numifbs=1

      # 3G
      - run: docker run --cap-add=NET_ADMIN --shm-size=1g --rm sitespeedio/sitespeed.io:42.5.1 -c 3g --browsertime.connectivity.engine=throttle https://www.sitespeed.io/

      # No Traffic shaping
      - run: docker run --shm-size=1g --rm sitespeedio/sitespeed.io:42.5.1 https://www.sitespeed.io/

      # No traffic shaping with performance budget
      - run: docker run --shm-size=1g --rm -v "$(pwd):/sitespeed.io" sitespeedio/sitespeed.io:42.5.1 -n 3 --budget.configPath myBudget.json https://www.sitespeed.io/

workflows:
  version: 2
  build:
    jobs:
      - test-sitespeed
You will notice that the last run is reading the performance budget file that exists in the git repo that was checked out. This will only work if you mount the checked-out repo as a volume for sitespeed. This makes it really efficient and convenient to allow sitespeed to pick up configuration files and to output results to a location where one can post-process with other scripts.
Gitlab CI
Gitlab has prepared an easy way to test using sitespeed.io: https://docs.gitlab.com/ee/user/project/merge_requests/browser_performance_testing.html.
Grunt plugin
Check out the grunt plugin.
Gulp plugin
Check out Ankit Singhal's gulp plugin.